Installation
This document describes all necessary steps in order to get a running Mapbender3 installation.
Prerequisites
Mapbender3 needs the following components in order to run:
- PHP 5.3.10 or later (php5)
- PHP CLI interpreter (php5-cli)
- PHP SQLite extension (php5-sqlite)
- PHP cURL extension (php5-curl)
- PHP Alternative PHP Cache (php-apc)
- PHP Internationalization (php5-intl)
- PHP GD (php5-gd) for printing
- PHP FileInfo for printing to check image format
- APACHE mod_rewrite
Optionally, in order to use a database other than the preconfigured SQLite one, you need a matching PHP extension supported by Doctrine.
If you want to use the developer mode, for using the web installer or creating profiler data to be used to analyze errors you will still need the SQLite extension!
Download
Installation packages are distributed as compressed packages and are available for download at the download page.
After downloading, extract the package in a directory of your choice. Then make sure your Webserver points to the web directory inside the mapbender3 directory you just uncompressed. You will also need to make sure that the default directory index is app.php. Use Apache REWRITE (install mod_rewrite) to access Mapbender3 without app.php in the URL.
Example for ALIAS configuration for Apache in file /etc/apache2/conf.d/mapbender3.conf (Apache 2.2) or /etc/apache2/conf-enabled/mapbender3.conf (Apache 2.4). Please create this file and make sure that Apache has the right to read the file.
Apache 2.4 uses different directives for Access Control (for example: “Require all granted”). Please see the Apache documentation: Upgrading to 2.4 from 2.2 for details.
Apache 2.4 configuration:
Alias /mapbender3 /var/www/mapbender3/web/
<Directory /var/www/mapbender3/web/>
 Options MultiViews FollowSymLinks
 DirectoryIndex app.php
 Require all granted

 RewriteEngine On
 RewriteBase /mapbender3/
 RewriteCond %{ENV:REDIRECT_STATUS} ^$
 RewriteCond %{REQUEST_FILENAME} !-f
 RewriteCond %{REQUEST_FILENAME} !-d
 RewriteRule ^(.*)$ app.php/$1 [PT,L,QSA]
</Directory>
Apache 2.2 configuration:
ALIAS /mapbender3 /var/www/mapbender3/web/
<Directory /var/www/mapbender3/web/>
  Options MultiViews
  DirectoryIndex app.php
  Order allow,deny
  Allow from all
</Directory>
# for Debian based distributions
# Debian basierte Distributionen
sudo a2enmod rewrite

#Windows activate module rewrite in httpd.conf
LoadModule rewrite_module modules/mod_rewrite.so
A Git-based installation - mainly for developers - is also possible.
Configuration
Using the command line
Configuring your Mapbender3 installation is made up of the following steps:
- Creating the database
- Creating the database schema
- Copying the bundles’ assets to the public web directory
- Initializing the role system
- Creating the “root” user
- Inserting srs parameters (EPSG code definition)
- Loading the applications of the mapbender.yml to your database
All can be done using the console utility provided by Symfony2, the Mapbender3 framework is built upon. There’s a mayor caveat though you should understand, before continuing:
The console utility will write files in the app/cache and app/logsdirectories. These operations are made using the user permissions ofwhatever user you’re logged in with. This is also true for the app/dbdirectory and the SQLite database within. When you open the applicationfrom within the browser, the server PHP process will try to access/writeall these files with other permissions. So make sure you give the PHPprocess write access to these files. See last step below.
Notice: The following steps assume that you are in the directory above the app directory (notice that for git installation that means mapbender3/application/ else mapbender3/).
cd mapbender3/
or for git based installation
cd mapbender3/application
Adapting the configuration file
Database connection parameters are stored together with some more configuration parameters in the file app/config/parameters.yml. This file is using YAML syntax, so be aware that you can not use tabs for indenting. Be careful about this and use whitespaces instead.
Your database configuration in the parameters.yml file could look like this when you use PostgreSQL:
database_driver:   pdo_pgsql
database_host:     localhost
database_port:     5432
database_name:     mapbender3
database_path:
database_user:     postgres
database_password: 1xyz45ab
Creating the database
Symfony2 can attempt to create your database, this works of course only if the configured database user is allowed to. Call the console utility like this:
app/console doctrine:database:create
Creating the database schema
Symfony2 will create the database schema for you:
app/console doctrine:schema:create
We also need to initialize the security system’s database tables separately:
app/console init:acl
Copying the bundles’ assets
Each bundle has it’s own assets - CSS files, JavaScript files, images and more - but these need to be copied into the public web folder:
app/console assets:install web
Alternatively, as a developer, you might want to use the symlink switch on that command to symlink instead of copy. This will make editing assets inside the bundle directories way easier.
app/console assets:install web --symlink --relative
Creating the administrative user
The first user - which has all privileges - must be created using the command:
app/console fom:user:resetroot
This will interactively ask all information needed and create the user in the database.
Alternatively, there is a silent mode you can use, if you want to use a script to install Mapbender3 and don’t want to be asked for all parameters:
app/console fom:user:resetroot --username="root" --password="root" --email="root@example.com" --silent
Inserting srs parameters
Inserting proj4 srs parameters into a database occurs using the command:
app/console doctrine:fixtures:load --fixtures=./mapbender/src/Mapbender/CoreBundle/DataFixtures/ORM/Epsg/ --append
Importing applications from mapbender.yml
Importing applications from mapbender.yml into a database occurs using the command:
app/console doctrine:fixtures:load --fixtures=./mapbender/src/Mapbender/CoreBundle/DataFixtures/ORM/Application/ --append
Write permission
Set owner, group and rights. Assign the files to the Apache user (www-data).
sudo chmod -R ugo+r /var/www/mapbender3
sudo chown -R www-data:www-data /var/www/mapbender3
You have to set write permission to app/cache and app/logs and web/assets.
sudo chmod -R ug+w /var/www/mapbender3/app/cache
sudo chmod -R ug+w /var/www/mapbender3/app/logs
sudo chmod -R ug+w /var/www/mapbender3/web/assets
sudo chmod -R ug+w /var/www/mapbender3/web/uploads
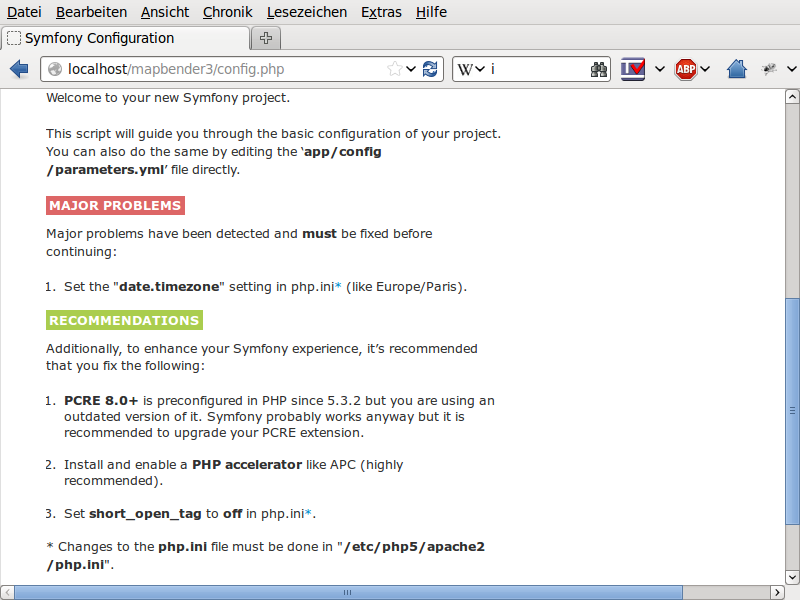
Check Symfonys config.php
You can start using Mapbender3 now. You can open the developer mode when you run app_dev.php.
Notice: Click on the Mapbender3 logo to get to the login page. Log in with the new user you created.
Installation Example for Ubuntu
Install necessary components:
sudo apt-get install php5 php5-pgsql php5-gd php5-curl php5-cli php5-sqlite sqlite php-apc php5-intl curl
Load Apache module rewrite:
sudo a2enmod rewrite
Configure the Apache ALIAS in file /etc/apache2/conf.d/mapbender3.conf (or for Apache 2.4 /etc/apache2/sites-enabled/mapbender3.conf) and restart your Apache server (keep in mind, that Apache 2.4 uses different directives for Access Control)
Example ALIAS Apache 2.4
Alias /mapbender3 /var/www/mapbender3/web/
<Directory /var/www/mapbender3/web/>
 Options MultiViews FollowSymLinks
 DirectoryIndex app.php
 Require all granted

 RewriteEngine On
 RewriteBase /mapbender3/
 RewriteCond %{ENV:REDIRECT_STATUS} ^$
 RewriteCond %{REQUEST_FILENAME} !-f
 RewriteCond %{REQUEST_FILENAME} !-d
 RewriteRule ^(.*)$ app.php/$1 [PT,L,QSA]
</Directory>
Check the ALIAS is working
Open Symfony´s Welcome Script config.php. This script checks whether all necessary components are installed and configurations are done. If there are still problems, you should fix them.
Set owner, group and rights. Assign the files to the Apache user (www-data).
sudo chmod -R ugo+r /var/www/mapbender3
sudo chown -R www-data:www-data /var/www/mapbender3
sudo chmod -R ug+w /var/www/mapbender3/web/assets
sudo chmod -R ug+w /var/www/mapbender3/web/uploads
Adapt the configuration file parameters.yml (app/config/parameters.yml) and define the database you want to create.
database_driver:   pdo_pgsql
database_host:     localhost
database_port:     5432
database_name:     mapbender3
database_path:
database_user:     postgres
database_password: 1xyz45ab
Run the app/console commands
cd /var/www/mapbender3
app/console doctrine:database:create
app/console doctrine:schema:create
app/console init:acl
app/console assets:install web
app/console fom:user:resetroot
app/console doctrine:fixtures:load --fixtures=./mapbender/src/Mapbender/CoreBundle/DataFixtures/ORM/Epsg/ --append
app/console doctrine:fixtures:load --fixtures=./mapbender/src/Mapbender/CoreBundle/DataFixtures/ORM/Application/ --append
Installation of Mapbender3 is done.
Check config.php
You have to set write permission to app/cache and app/logs
sudo chmod -R ug+w /var/www/mapbender3/app/cache
sudo chmod -R ug+w /var/www/mapbender3/app/logs
sudo chmod -R ug+w /var/www/mapbender3/web/assets
sudo chmod -R ug+w /var/www/mapbender3/web/uploads
You can start using Mapbender3 now. You can open the developer mode when you run app_dev.php.
Notice: Click on the Mapbender3 logo to get to the login page. Log in with the new user you created.
To learn more about Mapbender3 have a look at the Mapbender3 Quickstart.
Installation Example for Windows
Install necessary components:
- add the path to your PHP-bin directory to the PATH variable
- activate the PHP extensions in your php.ini configuration file
- load the Apache module rewrite
extension=php_curl.dll
extension=php_fileinfo.dll
extension=php_gd2.dll
extension=php_intl.dll
extension=php_pdo_pgsql.dll
extension=php_pdo_sqlite.dll
extension=php_pgsql.dll
extension=php_openssl.dll
# Windows: edit file httpd.conf and restart apache
LoadModule rewrite_module modules/mod_rewrite.so
Configure the Apache ALIAS and restart your Apache server (keep in mind, that Apache 2.4 uses different directives for Access Control)
Alias /mapbender3 c:/mapbender3/web/
<Directory c:/mapbender3/web/>
 Options MultiViews FollowSymLinks
 DirectoryIndex app.php
 Require all granted

 RewriteEngine On
 RewriteBase /mapbender3/
 RewriteCond %{ENV:REDIRECT_STATUS} ^$
 RewriteCond %{REQUEST_FILENAME} !-f
 RewriteCond %{REQUEST_FILENAME} !-d
 RewriteRule ^(.*)$ app.php/$1 [PT,L,QSA]
</Directory>
Check the ALIAS is working
Open Symfony´s Welcome Script config.php. This script checks whether all necessary components are installed and configurations are done. If there are still problems, you should fix them.
Adapt the configuration file parameters.yml (app/config/parameters.yml) and define the database you want to create.
database_driver:   pdo_pgsql
database_host:     localhost
database_port:     5432
database_name:     mapbender3
database_path:
database_user:     postgres
database_password: 1xyz45ab
Run the app/console commands with php. First you have to open a terminal (cmd).
c:
cd mapbender3
php.exe app/console doctrine:database:create
php.exe app/console doctrine:schema:create
php.exe app/console init:acl
php.exe app/console assets:install web
php.exe app/console fom:user:resetroot
php.exe app/console doctrine:fixtures:load --fixtures=./mapbender/src/Mapbender/CoreBundle/DataFixtures/ORM/Epsg/ --append
php.exe app/console doctrine:fixtures:load --fixtures=./mapbender/src/Mapbender/CoreBundle/DataFixtures/ORM/Application/ --append
Installation of Mapbender3 is done.
Check config.php
You can start using Mapbender3 now. You can open the developer mode when you run app_dev.php.
Notice: Go to the login link at the right-top and log in with the new user you created.
To learn more about Mapbender3 have a look at the Mapbender3 Quickstart.
Configuration files
The basic configuration is done inside the app/config/parameters.yml file. A template is provided in the app/config/parameters.yml.dist file.
app/config/config.yml provides more parameters f.e. to configure portal functionality, owsproxy or provide an additional database.
parameters.yml
- database: The parameters starting with database are the database connection details.
- mailer: The mailer settings start with mailer. Use f.e. smtp or sendmail.
- locale: You can choose a locale for your application (default is en, de is available). Check http://doc.mapbender3.org/en/book/translation.html to find out how to modify translations or how to add a new language.
Notice: You need a mailer for self-registration and reset password functionality.
config.yml
- fom_user.selfregistration: To enable or disable self-registration of users, change the fom_user.selfregistration parameter. You have to define self_registration_groups, so that self-registered users are added to these groups automatically, when they register. They will get the rights that are assigned to these groups.
- fom_user.reset_password: In the same way the possibility to reset passwords can be enabled or disabled.
- framework.session.cookie_httponly: For HTTP-only session cookies, make sure the framework.session.cookie_httponly parameter is set to true.
Notice: You need a mailer for self-registration and reset password functionality (see parameters.yml).
If you use a proxy you have to add the proxy settings to config.yml at section ows_proxy3_core.
This is how the configiration could look like:
ows_proxy3_core:
    logging: true
    obfuscate_client_ip: true
    proxy:
        host: myproxy
        port: 8080
        connecttimeout: 60
        timeout: 90
        noproxy:
            - 192.168.1.123
mapbender.yml
You can configure an applications on two ways. In the mapbender.yml file or with the browser in the Mapbender3 backend.
- The Mapbender Team provides an up-to-date mapbender.yml with demo applications. New elements with their parameters are added to this configuration in every new version (You can disable the applications by setting published: false or you can empty the mapbender.yml file)
- applications that are defined in the mapbender.yml are not editable in the backend
- you can import the applications to the database with the following app/console command
app/console doctrine:fixtures:load --fixtures=./mapbender/src/Mapbender/CoreBundle/DataFixtures/ORM/Application/ --append
Update Mapbender3 to a newer Version
To update Mapbender3 you have to do the following steps:
- get the new version from http://mapbender3.org/builds/ or nightlies from http://mapbender3.org/builds/nightly/
- save your configuration files and your old Mapbender
- replace the new files
- merge your configuration files (check for new parameters)
- update your Mapbender database
- That’s all! Have a look at your new Mapbender version
Update Example for Linux
Have a look at the steps as commands
# Download the new version
wget -O http://mapbender3.org/builds/mapbender3-3.0.4.0.tar.gz /tmp/build_mapbender3/
tar xfz /tmp/build_mapbender3/mapbender3-3.0.4.0.tar.gz

# save the old version
mv -R /var/www/mapbender3 /var/www/mapbender3_save

# get the code of the new version
cp -R /tmp/build_mapbender3/mapbender3-3.0.4.0 /var/www/
mv /var/www/mapbender3-3.0.4.0 /var/www/mapbender3

# copy your old configuration files to the new version
cp /var/www/mapbender3_save/app/config/parameters.yml /var/www/mapbender3/app/config/parameters.yml
cp /var/www/mapbender3/app/config/config.yml /var/www/mapbender3/app/config/config.yml-dist
cp /var/www/mapbender3_save/app/config/config.yml /var/www/mapbender3/app/config/config.yml

# manual step
# merge parameters.yml, config.ymls and if used mapbender.yml back to the new installation
# if you have individual templates: merge the templates with the new Mapbender version
# if you use screenshots: copy the screenshots from the old version back to mapbender3/web/uploads
# if you use your own print templates: copy them back to mapbender3/app/Resources/MapbenderPrintBundle/templates/

# change the accessrights and owner of the files
sudo chmod -R uga+r /var/www/mapbender3
sudo chown -R www-data:www-data /var/www/mapbender3
Update your Mapbender database
cd /var/www/mapbender3/

# for update from version 3.0.3.x to 3.0.4.0 on PostgreSQL you have to run the following SQL before you run app/console doctrine:schema:update --force
# ALTER TABLE fom_profile_basic DROP CONSTRAINT fom_profile_basic_pkey;

app/console doctrine:schema:update --dump-sql
app/console doctrine:schema:update --force
app/console assets:install web

# change the access rights and owner of the files
sudo chmod -R ugo+r /var/www/mapbender3
sudo chown -R www-data:www-data /var/www/mapbender3

# You have to set write permission to app/cache and app/logs.
sudo chmod -R ug+w /var/www/mapbender3/app/cache
sudo chmod -R ug+w /var/www/mapbender3/app/logs
sudo chmod -R ug+w /var/www/mapbender3/web/assets
sudo chmod -R ug+w /var/www/mapbender3/web/uploads