PrintClient
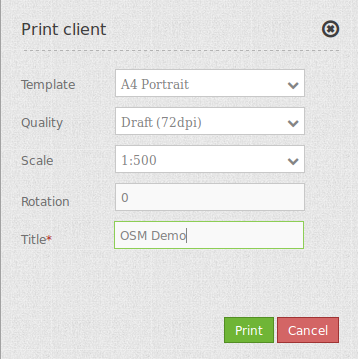
Print Client allows you to print a defined area of your map. You can choose a template, a format and a scale you want to use for printing. You can allow to rotate the area you want to print.
Please note: The PrintClient is still under construction.
Configuration
You need a button to show this element. See Button for inherited configuration options.
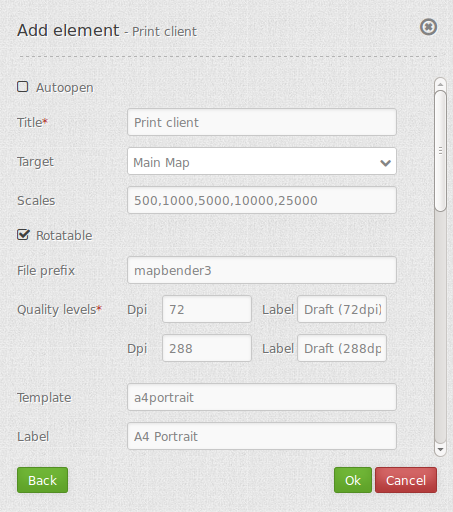
YAML-Definition:
target: map                                 # Id of Map element to query
autoOpen: false                             # true/false open when application is started, default is false
templates:
    - { template: a4portrait, label: A4 Portrait, format: a4}       # template name, template file name without file extension (Mapbender is looking for file a4portrait.odg an a4portrait.pdf), Template files are located at app/Resources/MapbenderPrintBundle
    - { template: a4landscape, label: A4 Landscape, format: a4}     # template label in the dialog, format (a4,a3,...) has to be defined
scales: [5000, 10000, 25000]                        # define scales to choose from selectbox or if empty free scale can be defined in a textfield
quality_levels:                                     # define quality levels in dpi
    - { dpi: 72 , label: Draft (72dpi)}             # 72 - dpi value, Draft - label
    - { dpi: 288,  label: Document (288dpi)}        # 288 - dpi value, Document - label
rotatable: true                                     # true/false use true for rotation, default is true
optional_fields:                            # define optional fields (example title-field)
    title:                                  # name of the optional fields, default is null (no optional fields are defined)
        label: Title                        # label of the optional field
        options:                            #
            required: false                  # true or false
    comment1:
        label: Comment 1
        options: { required: false }
    comment2:
        label: Comment 2
        options: { required: false }
    editor:
        label: Editor
        options: { required: true }
replace_pattern:                            # You can modify the maprequest for printing
        -                                   # you can add additional parameters like map_resolution (for MapServer)
            default: { 288: '&map_resolution=288' }
        -
            pattern: 'stadtplan.xml'        # or you can request a different service which is optimized for printing
            replacement: { 288: 'stadtplan_4.xml' }
Class, Widget & Style
- Class: Mapbender\CoreBundle\Element\PrintClient
- Widget: mapbender.element.printClient.js
File location
northarrow The “North arrow” image is located at app/Resources/MapbenderPrintBundle/images/. You can replace the “North arrow” image to use a different image as northarrow.
print templates You find the print templates at app/Resources/MapbenderPrintBundle/templates/. Create your own print template to provide an individual output for your application.
Create your individual templates
To create an individual print template use an existing print template odg-file or create a new Libre Office Draw file. Your template can have fixed objects like your logo, copyright or print information. In addition you have to create a layer for the dynamic elements like map, overview, northarrow, scale, date and optional fields. The dynamic layer is an additional non printable layer in your Libre Office Draw file. Add this layer with Menu -> Add -> Layer -> define a name for the layer and choose the option not printable.
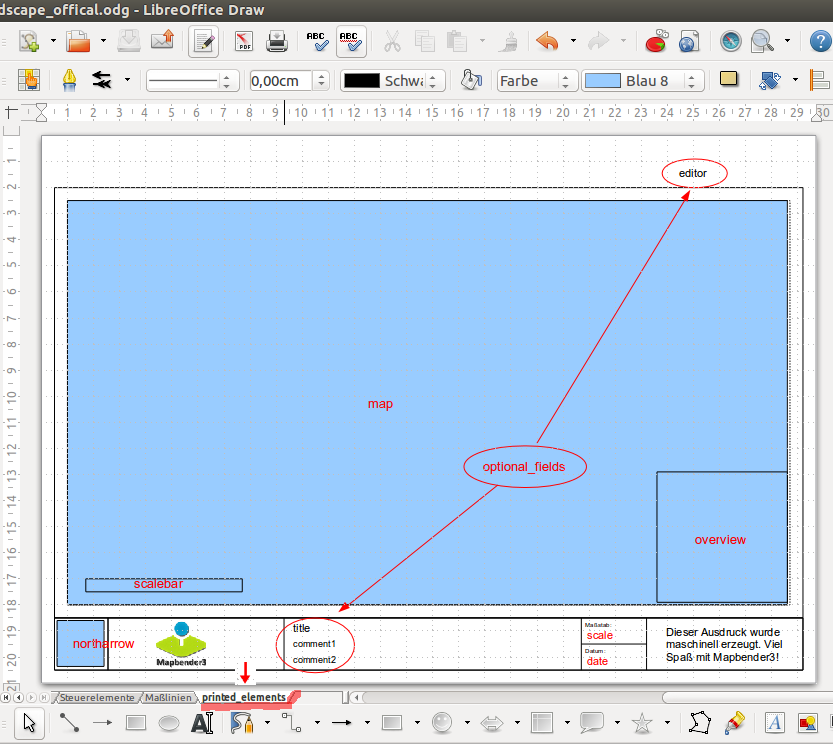
Define areas for the map, northarrow, scale, date and optional fields.
The following objects are available from Mapbender:
- map
- overview
- scale
- scalebar
- date
- northarrow (Nordpfeil)
You can define optional fields in the element definition (like title, comment, editor) and add them to the Open Office Draw file.
Export the template to pdf under the same name as the odg file. Use the name without extension in your print yml-definition.
The print script will read the information (position, size, font size, alignment) from the odg file and will also use the pdf with the fixed objects to generate the new pdf.