Installation on Ubuntu and Debian
The following Installation manual describes the neccessary steps on a recent Ubuntu or Debian system. We assume that Apache 2.4 is running on the system. A documentation for Apache 2.2 is added at the end of the document.
Please take note of the system requirements, where you can also find the Download links to Mapbender3.
There are also the neccessary components listed that you can install like this:
sudo apt-get install php5 php5-pgsql php5-gd php5-curl php5-cli php5-sqlite sqlite php-apc php5-intl curl openssl
Load the Apache rewrite-module:
sudo a2enmod rewrite
Configure the Apache Alias. We assume that Mapbender3 is unzipped into /var/www/mapbender3 (see the System Requirements and Download chapter for details). You can easily unpack Mapbender3 to a different directory and only adjust the following file to refer to the right directory.
Create the file /etc/apache2/sites-available/mapbender3.conf with the content below.
Alias /mapbender3 /var/www/mapbender3/web/
<Directory /var/www/mapbender3/web/>
 Options MultiViews FollowSymLinks
 DirectoryIndex app.php
 Require all granted

 RewriteEngine On
 RewriteBase /mapbender3/
 RewriteCond %{ENV:REDIRECT_STATUS} ^$
 RewriteCond %{REQUEST_FILENAME} !-f
 RewriteCond %{REQUEST_FILENAME} !-d
 RewriteRule ^(.*)$ app.php/$1 [PT,L,QSA]
</Directory>
Activate the site afterwards with
Reload your Apache server.
service apache2 reload
Check
Check that the Alias is working:
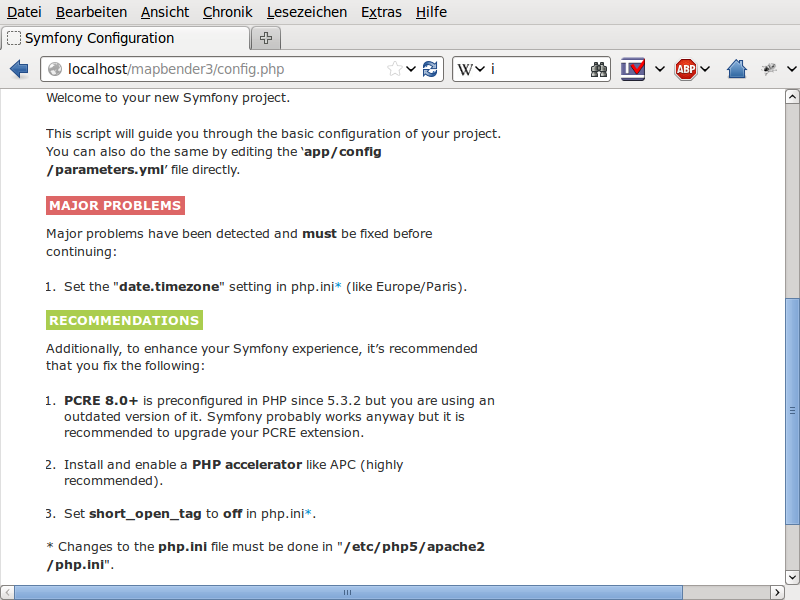
Open Symfony´s Welcome Script config.php. This script checks whether all necessary components are installed and configurations are done. If there are still problems, you should fix them.
Configuration of Mapbender3
Set the write permission for user (u), group (g) and others (a) and rights. Assign the files to the Apache user (www-data).
sudo chmod -R ugo+r /var/www/mapbender3
sudo chown -R www-data:www-data /var/www/mapbender3
sudo chmod -R ug+w /var/www/mapbender3/web/uploads
Adapt the Mapbender3 configuration file parameters.yml (app/config/parameters.yml) and define the database you want to create. Further information is available in the chapter Configuring the database.
database_driver:   pdo_pgsql
database_host:     localhost
database_port:     5432
database_name:     mapbender3
database_path:     ~
database_user:     postgres
database_password: secret
Run the app/console commands. You find detailed information for this commands in the chapter Details of the configuration of Mapbender3.
cd /var/www/mapbender3
app/console doctrine:database:create
app/console doctrine:schema:create
app/console assets:install web
app/console fom:user:resetroot
app/console doctrine:fixtures:load --fixtures=./mapbender/src/Mapbender/CoreBundle/DataFixtures/ORM/Epsg/ --append
app/console doctrine:fixtures:load --fixtures=./mapbender/src/Mapbender/CoreBundle/DataFixtures/ORM/Application/ --append
Installation of Mapbender3 is done.
Check the config.php again:
You have to set write permission to app/cache, app/logs and web/uploads.
sudo chmod -R ug+w /var/www/mapbender3/app/cache
sudo chmod -R ug+w /var/www/mapbender3/app/logs
sudo chmod -R ug+w /var/www/mapbender3/web/uploads
You can start using Mapbender3 now.
Notice: Click on the Mapbender3 logo to get to the login page. Log in with the new user you created.
You can open the developer mode when you run app_dev.php: http://localhost/mapbender3/app_dev.php
To learn more about Mapbender3 have a look at the Mapbender3 Quickstart.
Instructions for Apache 2.2
Unlike Apache 2.4 you have to place the mapbender3.conf file for Apache 2.2 into the directory /etc/apache2/conf.d/
Apache 2.2 configuration:
ALIAS /mapbender3 /var/www/mapbender3/web/
<Directory /var/www/mapbender3/web/>
  Options MultiViews
  DirectoryIndex app.php
  Order allow,deny
  Allow from all
</Directory>
Please note that Apache 2.2 uses different Access Control directives than Apache 2.4 (Allow from all).